This is for anyone who’s never built a campfire before, in case you’re trying to learn how it’s done.
Necessary components: fuel, air, and ignition.
Fuel: materials for sustaining and feeding the fire:
Tinder: initial material used to ignite fire—dry leaves, grass, bark shavings, or cotton balls coated in petroleum jelly; highly combustible materials that catch fire with a small spark or flame.
Kindling: dry, toothpick-sized twigs to finger-thick branches that catch fire easily and provide initial sustenance for flames.
Fuelwood: larger logs and branches to maintain the fire, gradually added to fire as it grows. Use dry, seasoned wood to ensure efficient burning.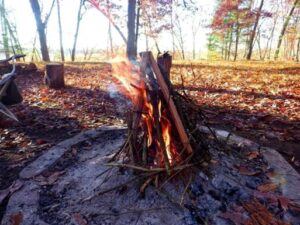
Air: oxygen, a vital component. Adequate airflow allows fire to breathe and burn efficiently. Proper ventilation so oxygen can reach flames is crucial.
To maximize airflow, leave enough space between logs or fuelwood to allow air circulation. Arrange the fuel in a way that allows oxygen to reach the base of the fire. Avoid building fire in enclosed spaces that restrict airflow.
Insufficient airflow can cause smoky fires or extinguish the flames altogether. Protect initial fire from collapse to avoid this situation.
Matches: Waterproof matches or strike-anywhere matches are best. Keep dry.
Lighters: Disposable or refillable gas lighters provide a convenient and easily controllable flame. Protect from moisture.
Fire Starters: fire-lighting cubes or compressed sawdust blocks infused with wax.
Natural Ignition: Friction (fire plow, hand drill), sparks from flint and steel, or focusing sunlight through a magnifying glass can also initiate ignition without relying on external tools.
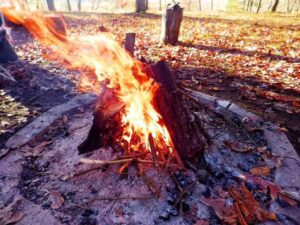
- The Teepee Fire
One of the simplest and most common for use in wilderness, beginner-friendly and ideal for cooking and warming. most effective for calm, dry conditions. In wet or windy conditions, consider other methods.
You’ll need:
- Dry twigs and small branches for kindling
- Medium-sized wood for fuel
- Larger logs to sustain the fire
- Matches or a fire starter
Step-by-Step Guide:
- Clear a spot for your fire away from trees, bushes, or anything that can catch fire.
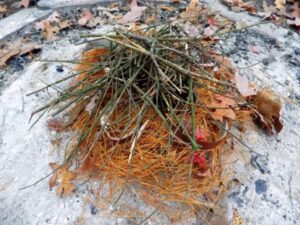
- Create a fire bed with some dry leaves or bark.
- Lay your kindling in the middle of your fire bed.
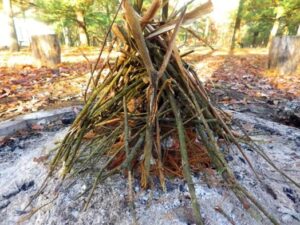
- Arrange your medium-sized wood in a teepee shape over the kindling.
- Ignite fire, then add larger logs to keep the fire burning longer.
- The Lean-to Fire
Use in windy conditions as it uses the wind to its advantage. Shields the fire from one side, allowing wind to feed oxygen to the fire from the other. May not be as effective in calm conditions or when the wind direction keeps shifting.
Use:
- Dry, thin twigs for kindling
- Medium to large-sized logs
- A long, sturdy piece of wood to serve as the lean-to
- Matches or a fire starter
Step-by-Step Guide:
- Clear a spot away from trees, flammable vegetation, or fire hazards.
- Lay the long, sturdy piece of wood at an angle, with one end on the ground and the other resting on a log or rock. This will serve as your lean-to.
- Place your kindling underneath the lean-to, ensuring enough room for airflow.
- Lean your medium-sized logs against the lean-to, creating a sloped wall.
- Ignite the kindling. As the fire grows, it will catch onto the larger logs.
- Add more logs as needed, ensuring they lean against the lean-to and not smothering the fire.
If it’s calm or the wind changes directions, consider other fire-building techniques, such as the Teepee or the Dakota Fire Hole.
Log Cabin Fire
Utilizes a structure reminiscent of a log cabin. Characterized by its stability, long burn time, and high heat output, making it ideal for cooking or keeping warm in harsh weather.
Use:
- Dry, thin twigs for kindling
- Medium to large-sized logs
- Matches or a fire starter
Step-by-Step Guide:
Prepare fire area. Distance from flammable material is crucial to prevent accidental fires.
- Set up a small Teepee fire in the center of fire spot, using kindling.
- Lay two larger logs parallel to each other on either side of your Teepee fire, leaving some space in between for airflow.
- Lay two more logs perpendicular to your first two logs, creating a square shape. The Teepee fire should be enclosed within this square.
- Continue stacking logs this way, alternating the direction with each layer and gradually reducing the size of the logs as you build upwards, similar to a log cabin.
- When structure is stable and sizable, ignite the Teepee fire. The fire will slowly spread to the larger logs, generating a steady, long-lasting fire.
- Add more logs as needed, maintaining the log cabin structure.
- Most beneficial for steady, long-lasting fire, perfect for cooking or heating. If situation needs a quick, large fire or wind conditions are unfavorable, consider Lean-To or Teepee methods.
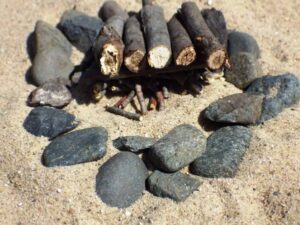
- Star Fire
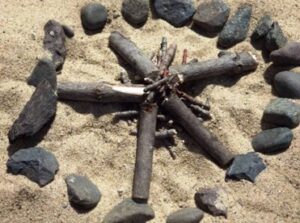
Often called the Indian Fire, another effective method for a controlled and sustainable fire. Star-shaped, this fire layout offers the advantage of low maintenance and a controlled burn rate.
Use: Dry, thin twigs for kindling, 5-6 pieces of large firewood, matches or fire starter
Step-by-Step Guide:
Prepare clear fire area safe from flammable materials.
- Create small Teepee fire at the center of fire spot with kindling, acts as heart of Star fire.
- Arrange large pieces of firewood in a star pattern, with one end of each log meeting at the center of the Teepee fire.
- Ignite with matches or fire starter. Fire will gradually burn toward the ends of the logs.
- As the fire burns, push the logs towards the center to maintain the fire. The slower you push them in, the slower the fire burns.
Ideal for low-maintenance fire, and a relaxed, lengthy outdoor experience. However, it may not be the best choice if you need a quick, high flame or are dealing with windy conditions, as it burns slower and less aggressively than methods like the Teepee or Lean-To.
- Dakota Fire Hole
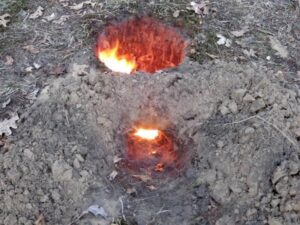
Highly efficient and effective, primarily known for its minimal visibility and smoke production. Favorable in survival situations where discretion is paramount, also excels in high wind and facilitates adequate heat for cooking.
Use:
- A digging tool (shovel or a stick)
- Dry sticks and twigs for kindling
- Firewood
- Matches or a fire starter
Step-by-Step Guide:
Select an area clear of flammable materials. Consider wind direction; airflow will aid in fueling the fire.
- Dig a hole about 1 foot deep and a foot in diameter, keeping hole’s walls smooth and compact.
- Dig a smaller hole, about 6 inches in diameter, a foot away from first hole. Should connect to the first hole at the bottom, forming a tunnel.
- Place your kindling into the giant hole and ignite it with your matches or fire starter.
- As the kindling starts to burn, add more firewood to increase the size of the fire.
Ideal where concealment is necessary – both visual and olfactory. Allows for efficient fuel consumption, making it a perfect choice where resources are limited. May not be suitable for dense, rocky, or hard ground, making digging difficult. Labor-intensive to set up compared to the Star Fire or Teepee methods.
5. Upside-Down Fire
Also known as a “top-down fire,” largest logs are on the bottom of the fire, and the smallest pieces of wood are on the top. The Upside-Down Fire burns steadily for hours with little to no maintenance, making it an ideal choice for a campfire, fireplace, or cooking fire.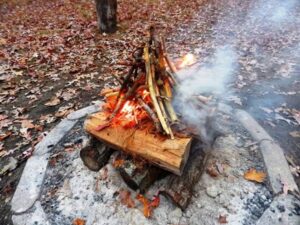
Use:
- Large logs
- Medium-sized logs
- Small logs or large sticks
- Kindling
- Tinder
- Matches or a fire starter
Step-by-Step Guide:
Place the large logs in a flat, square layer at the base.
- On top, place a row of medium-sized logs perpendicular to the first layer.
- Continue with a layer of small logs or large sticks, followed by a layer of kindling.
- Finally, add your tinder on the top layer, ensuring it is compact and dry for easy lighting.
- Light the tinder with your matches or fire starter and wait for the fire to gradually burn down from the top, igniting the layers below.
Perfect for where you need a fire to last a long time without maintenance, such as overnight campfires or when you are busy with other tasks.
An upside-down fire may not be the most effective if you need immediate high heat for cooking or if your fuel is limited since it requires a significant amount of wood. Also takes more time than other methods like the Teepee or the Dakota Fire Hole.
5. Swedish Fire Torch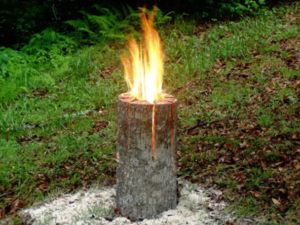
Also known as a “Swedish Torch” or “Swedish Candle,” an autonomous campfire method using a single log, which burns vertically, providing a flat surface for cooking, and requires less fuel than traditional campfires.
Use:
- One large, dry log (preferably hardwood)
- Saw or axe
- Kindling
- Tinder
- Matches or a fire starter
Step-by-Step Guide:
Cut a cross into the top part of your log and about three-quarters of the way down.
- Stuff cuts with tinder and kindling, ensuring they reach deep into the log.
- Light the kindling and tinder with your matches or Firestarter. The fire will burn from the top down, drawing air in through the cuts and creating a self-sustaining, controlled burn.
- An excellent choice for cooking food or boiling water because the burning log provides a natural ‘stove-top.’ It also works well when the ground is wet since the fire is elevated.
- While efficient, it’s not ideal for a large, warm fire for heat or light, such as a large campfire. Additionally, this method demands a log of a certain size and may not be feasible if only smaller pieces of wood are available.
Excellent choice for cooking food or boiling water because the burning log provides a natural ‘stove-top.’ It also works well when the ground is wet since the fire is elevated. Not ideal for a large, warm fire for heat or light, such as a large campfire.
8. Keyhole Fire
Versatile campfire method that offers a warm, open fire and hot, concentrated heat for cooking, and a separate section for coals to be used for cooking.
Use:
- A shovel or trowel
- Dry leaves, sticks, or grass (tinder)
- Sticks less than 1 inch around (kindling)
- Logs less than 5 inches around and logs around 3 feet long (fuel)
- Matches or a fire starter
Step-by-Step Guide:
Dig a circle about 2 feet in diameter and about 1 foot deep for fire pit.
- Dig a smaller hole attached to the circle on one side. This keyhole shape allows you to have a fire and then pull coals into the smaller hole for cooking.
- Fill the circular section with tinder, then kindling, and then larger logs. Remember to structure the layers appropriately, allowing air to pass through.
- Light the tinder. As the fire burns, move hot coals into the smaller hole.
- Place a grill or pot over the smaller hole for cooking.
Can use to cook meals efficiently while the central fire keeps your campsite warm. Can be labor-intensive, requiring constant attention to move the coals and maintain the fire. It also might not be suitable in areas where digging is not allowed or feasible.
Windy day fire